Friday, August 8, 2014

5 Minute Chicken Tacos


If you're a mom like me, then you have a busy schedule.  I know all you Mary Poppins types out there probably have your meals planned days in advance and are making things like homemade noodles and such, but I have little time left at the end of every day.  

That's why I like to remember recipes like this one that are quick, easy, and delicious!

In a rush like usual, I made my family these 5 minute tacos.  I'm telling you these actually take just 5 minutes of your time!

Here's what you will need:

1 Rotisserie Chicken 
You can find these pre-cooked chickens at any grocery store.  If you can't find one, you can also use canned chicken or any type of pre-cooked chicken.  If you prefer to do the chicken from scratch, then it will add time to these 5 minute miracles!
1 Cup Salsa
1 8oz Package Cream Cheese
1/2 Cup Water
1 Package Taco Seasoning
1 Can Black Beans
1 Can Corn
Tortillas
Veggies

In a large skillet. combine salsa, taco seasoning, and cream cheese.  Heat over low until cream cheese is mostly melted.  Add water, beans, corn, and cooked chicken.  Simmer until hot and bubbly.  Don't overheat.


I used a homemade salsa made by my father-in-law, but any salsa will do.

After the filling is heated, remove from heat.  Serve on warm tortillas with veggies of your choice. :)


That's it. These are adult pleasing and kid friendly.  They take no time at all, and are delicious!

I stuck to the basics and just used shredded lettuce and cheese to save me time on cutting up veggies.  I was in a big hurry!  
These were good.  The hubby went back 3 times!

What kind of recipes save your life on a night like mine?


Thursday, August 7, 2014

Repurposed Dresser


I have to say, I am SUPER proud of my project this week.
I started with a nasty $5 dresser I picked up at a yard sale.

Although the thing was covered in about 15 layers of paint, I saw the potential!


Here it was.  My original purpose was going to be to refinish this little dresser.  But as I scraped, and scraped, and sanded, and sanded, it looked like there was no end in sight.  Here it is after 2, I repeat TWO coats of stripper and scrapings...

UG.  I tried to make it work as a dresser, but after hours of sanding and a coat of my homemade chalk paint, I just didn't see it looking very good as a dresser.

So a week went by and I settled on the fact that the top of this thing, although real wood, would not look great.  I decided to go with the bench idea.  
I started by removing the top.  This left me with just one set of drawer slides to remove, since I was going to keep one drawer in place.
I reused the top by flipping it upside down to hide all the damage.  I cut it to size with my skil saw and used it as a seat.


There are also a few supports in there that you can see if you look closely.  
I used the drawer slides that I had removed as trim on the front and top.  
They had some imperfections in them, but I figured that it gives the bench some character.
This thing is repurposed!
Then I purchased a sheet of bead board and piece of trim.  I lined the inside of the bench with the bead board and trim. 
I decided on teal and grey for the paint scheme.  Of course I distressed it, and glazed it!


Found these knobs at Hobby Lobby...


Here it is completed. 


I love it!  It looks so cute there in my little nook, that I am of course dreading parting with it.  :/  Same old story I know.


What do you think?


Wednesday, August 6, 2014

The Vintage Desk


I recently acquired this old waterfall desk at an estate sale.  It had definite potential!
I had already removed the hardware and gave it a light sanding in this picture.


I decided to go with my homemade chalk paint just like I used for my dresser redo.
I used a slate blue and off white color.

I mixed 1/2 Cup Plaster of Paris
1/2 Cup HOT water
1 1/2 Cups of Paint

I did give the thing a coat of primer with the spray on primer.  Then I went to work with the chalk paint.


After 2 coats of Chalk paint, I used a dark mahogany stain on the top.

I went back and sanded around the edges, corners, and legs to give it a distressed look.


I gave the drawers a coat of dark brown glaze.  This helped me to achieve that perfect antiqued look.
I found the cute little decal on a glass that I found at the thrift store.  I thought it looked good...


Next, I used some old scrapbook paper and decoupaged the top, and the inside of the drawers.  I decided to do this because the veneer on top wasn't perfect, but I didn't want to strip it.  I love how it turned out.  I really think it gave the desk some character.


 Covered it with a few coats of poly to protect the paper and vwa-la!
I used the original handles, which I painted black. 


What do yo think?  I absolutely love it.  Like usual, I don't want to sell it. :/
But... Yes I am selling this piece.


Tuesday, July 29, 2014

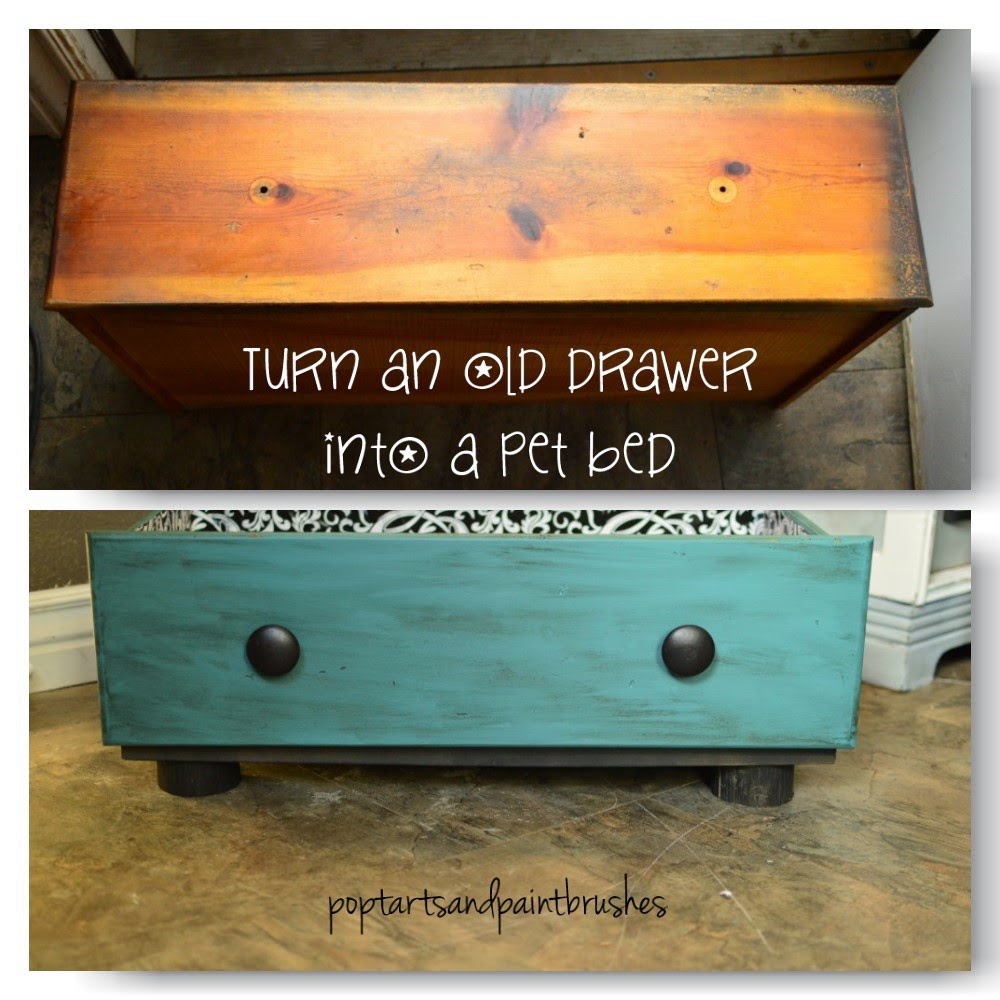
DIY Pet Bed


Hey everyone!  I am super excited to show you this project I worked on all day today!

I started with this old drawer that came out of one of my broken dressers.

I had already removed the knobs.  It's just a plain ol' drawer.  Nothing special.  
My mom had told me about these cute drawers made into pet beds.  I am sure they were made with more high quality drawers, but this one is what I had.

I gave it a light sanding, and mixed up my own chalk paint.
I did this using Plaster of Paris, Hot water, and Latex paint.
1/2 part Plaster of Paris
1/2 Part HOT Water
2 Parts Latex Paint

To tell you the truth, I have never used real chalk paint, so I can't tell you if it works as well.  This is the 3rd time I have made my own, and it seems to be working fine. 
 Back to the drawer...
I gave it 2 nice coats of chalk paint.


While that was drying I made my support for the drawer.  I used 2 pieces of pine that I already had.  I cut those to the exact length of the bottom of the drawer.  Then I spray painted them black.  For the legs I cheated.  You know those pre-treated logs that you can buy at the hardware store?
Well we had some of those that were lying around.  I cut them into even lengths and attached them to the pine with wood glue.  I also painted these black.


Next I attached both of those pieces to the drawer bottom with wood glue and a nail gun.

I lined the inside of the drawer with wrapping paper.  I did this using mod podge.  And of course I gave the drawer the distressed look by using a bit of glaze on it.  I finished it with a coat of spray on urithane.

Here it is...
What do you think?


 I love how it turned out.  I really am happy with my choice to use logs as legs since all the legs I found were well over $7 each.  This improvise saved me about $40!


Sunday, July 20, 2014

DIY Faux-Hawk Haircut


If you are like me and have boys, taking them into the salon for haircuts every cuple of weeks can get spendy.  Here is a little tutorial on how I cut my boys hair.  I am not a pro.  This is how I do it to save some money.

This is the Faux-hawk style.

Here's what you will need:


*Clippers w/ a size 3/8 or 3 attatachment

*Shears
I got mine for aroud $14 on Amazon.  They have some that are more, and some that are less.  Any decent pair will work.


*Comb


Start by seperating the hair.  Part it into 2 sections, leave the top alone for now.
The hair should normally part here.  Follow that line all the way around the head.

Step 1.
Using your clippers with your size 3 attatchment, remove hair in an upward stroke.  When you get to the top, pull the clippers towards you.  This will help your blending.  Leave a small amount around the top hair.  You can see from the picture that I only leave about an inch.  Do this all the way around the head to the other side.


Step 2.
With no attatchement, go around the ears, around the neck and the base of the head.  This should leave a nice crisp line.  Do Not go above where the natural hair line is.  This will give your child the old man look, as I like to call it.


Step 3.
Time for the top.  Wet hair.  Using a comb and your shears, comb hair upwards.  Fan hair out and cut off desired amount.  I leave enough to style the hair, about 2-3 inches.  Start by grabbing a small section of hair, cut, and then grab another section.  Use your first cut as your guide to keep the hair even.  Work from the back of the head to the front.  
After you have cut all of the hair this way, comb it mowhawk style and trim any pieces that you missed.

Step 4.
The bangs.  Comb the hair foward down flat.  Cut the bangs to desired length.  I usually cut, comb up, and cut again.  Take a little off at a time, stand hair up.  If it's too long, cut some more.  While cutting the bangs shape them to your child's natural hairline around the face.


Step 5. 
Time to blend.

Right now, if you were to leave this, you would see a definate line where you used your clippers and where you cut on the top.  This line I refer to as the "DING DING!  YOUR MOM CUT YOUR HAIR!"

Take your haircut to the next step. As you comb the sides down you will see where the hair is quite a bit longer than the hair you used your clippers on.  Flip your comb upside down, comb up and pull the comb out.  Using your clippers with no attatchment, run the clippers along the comb where the hair is sticking out.

This is the fastest and easiest way to blend.  If you are a newbie and are a little intimidated by this blending technique, then you can also use a size 2 attatchment on your clippers and go around the sides.
The comb method will leave you with a nice clean blend.  If you are confident enough to do it this way I highly suggest it.  Go all the way around the head on the sides.  Continue to comb down and see where there are problem areas that need to be blended better.


Step 6.

This is the final step!
Comb over the hair at a natural part to one side.  You can see in the top picture how the hair is not nicely faded.  To fix this, start close to the forehead, grab a small section of hair and pull it back at an angle towards you.  Now you can see where there is a long piece and a short piece where you just blended in your sides. Using your shears, cut the long piece off.   Do this in small sections all the way towards the back of the head.  Then repeat on the other side by combing the hair the opposite way, and following the same steps.

Here's the end result:


Again, I am not a professional.  This is just how I cut my boys hair to help save me about $100 a month.  
Please only use these instructions for the same reasons. :)