Tuesday, July 29, 2014

DIY Pet Bed


Hey everyone!  I am super excited to show you this project I worked on all day today!

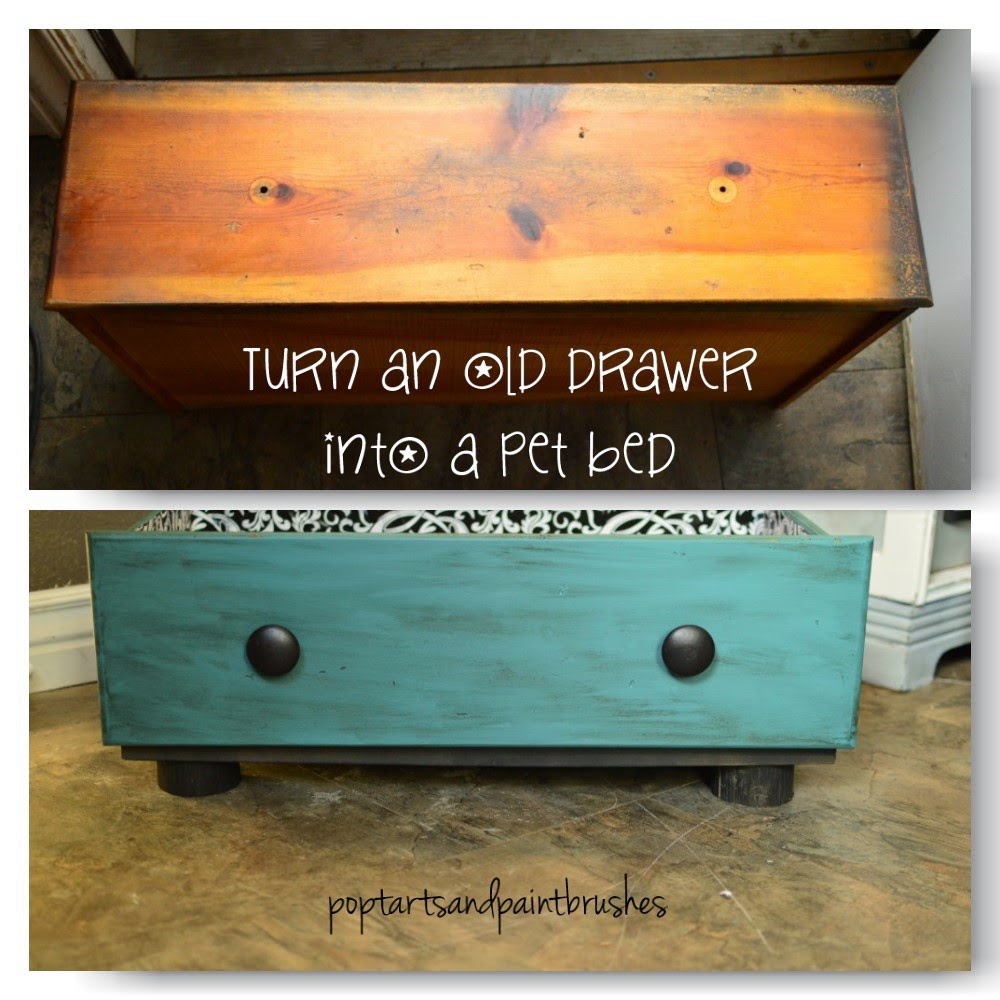
I started with this old drawer that came out of one of my broken dressers.

I had already removed the knobs.  It's just a plain ol' drawer.  Nothing special.  
My mom had told me about these cute drawers made into pet beds.  I am sure they were made with more high quality drawers, but this one is what I had.

I gave it a light sanding, and mixed up my own chalk paint.
I did this using Plaster of Paris, Hot water, and Latex paint.
1/2 part Plaster of Paris
1/2 Part HOT Water
2 Parts Latex Paint

To tell you the truth, I have never used real chalk paint, so I can't tell you if it works as well.  This is the 3rd time I have made my own, and it seems to be working fine. 
 Back to the drawer...
I gave it 2 nice coats of chalk paint.


While that was drying I made my support for the drawer.  I used 2 pieces of pine that I already had.  I cut those to the exact length of the bottom of the drawer.  Then I spray painted them black.  For the legs I cheated.  You know those pre-treated logs that you can buy at the hardware store?
Well we had some of those that were lying around.  I cut them into even lengths and attached them to the pine with wood glue.  I also painted these black.


Next I attached both of those pieces to the drawer bottom with wood glue and a nail gun.

I lined the inside of the drawer with wrapping paper.  I did this using mod podge.  And of course I gave the drawer the distressed look by using a bit of glaze on it.  I finished it with a coat of spray on urithane.

Here it is...
What do you think?


 I love how it turned out.  I really am happy with my choice to use logs as legs since all the legs I found were well over $7 each.  This improvise saved me about $40!


Sunday, July 20, 2014

DIY Faux-Hawk Haircut


If you are like me and have boys, taking them into the salon for haircuts every cuple of weeks can get spendy.  Here is a little tutorial on how I cut my boys hair.  I am not a pro.  This is how I do it to save some money.

This is the Faux-hawk style.

Here's what you will need:


*Clippers w/ a size 3/8 or 3 attatachment

*Shears
I got mine for aroud $14 on Amazon.  They have some that are more, and some that are less.  Any decent pair will work.


*Comb


Start by seperating the hair.  Part it into 2 sections, leave the top alone for now.
The hair should normally part here.  Follow that line all the way around the head.

Step 1.
Using your clippers with your size 3 attatchment, remove hair in an upward stroke.  When you get to the top, pull the clippers towards you.  This will help your blending.  Leave a small amount around the top hair.  You can see from the picture that I only leave about an inch.  Do this all the way around the head to the other side.


Step 2.
With no attatchement, go around the ears, around the neck and the base of the head.  This should leave a nice crisp line.  Do Not go above where the natural hair line is.  This will give your child the old man look, as I like to call it.


Step 3.
Time for the top.  Wet hair.  Using a comb and your shears, comb hair upwards.  Fan hair out and cut off desired amount.  I leave enough to style the hair, about 2-3 inches.  Start by grabbing a small section of hair, cut, and then grab another section.  Use your first cut as your guide to keep the hair even.  Work from the back of the head to the front.  
After you have cut all of the hair this way, comb it mowhawk style and trim any pieces that you missed.

Step 4.
The bangs.  Comb the hair foward down flat.  Cut the bangs to desired length.  I usually cut, comb up, and cut again.  Take a little off at a time, stand hair up.  If it's too long, cut some more.  While cutting the bangs shape them to your child's natural hairline around the face.


Step 5. 
Time to blend.

Right now, if you were to leave this, you would see a definate line where you used your clippers and where you cut on the top.  This line I refer to as the "DING DING!  YOUR MOM CUT YOUR HAIR!"

Take your haircut to the next step. As you comb the sides down you will see where the hair is quite a bit longer than the hair you used your clippers on.  Flip your comb upside down, comb up and pull the comb out.  Using your clippers with no attatchment, run the clippers along the comb where the hair is sticking out.

This is the fastest and easiest way to blend.  If you are a newbie and are a little intimidated by this blending technique, then you can also use a size 2 attatchment on your clippers and go around the sides.
The comb method will leave you with a nice clean blend.  If you are confident enough to do it this way I highly suggest it.  Go all the way around the head on the sides.  Continue to comb down and see where there are problem areas that need to be blended better.


Step 6.

This is the final step!
Comb over the hair at a natural part to one side.  You can see in the top picture how the hair is not nicely faded.  To fix this, start close to the forehead, grab a small section of hair and pull it back at an angle towards you.  Now you can see where there is a long piece and a short piece where you just blended in your sides. Using your shears, cut the long piece off.   Do this in small sections all the way towards the back of the head.  Then repeat on the other side by combing the hair the opposite way, and following the same steps.

Here's the end result:


Again, I am not a professional.  This is just how I cut my boys hair to help save me about $100 a month.  
Please only use these instructions for the same reasons. :)


Wednesday, July 16, 2014

Vintage Dresser Redo


Recently I picked this baby up at a yard sale for just $20!


It needed some work definitely! I had already removed the handles in this picture.  Even though she needed some love, I saw her potential.  


Here's a close up of the top.  Water marks and scratches.  Since this dresser is 100% real wood I wasn't too worried.


I started by removing all the drawers and doors, and giving the whole thing a good sanding.  I used 100 grit sandpaper and a palm sander.  It's the way to go when you have a lot of sanding to do.  Makes it go by fast.

Next, I gave the everything except the top 2 coats of primer.  I used the spray paint type, which my primer time super fast and easy.  It also dries faster than the brush on type, and you don't have to worry about brush lines.  The cans were about $4 each.  It took 2 cans for this project.

While my primer was curing, I did the top.  I used Minwax PolyShades in Bombay Mohogany.


It makes the staining process fantastic because it stains and poly's all in one quick step!  I did 2 coats of this on the top.


She's starting to look up!

After a full day of dry time, I went back to more sanding.....
Ug!
But it's important.  I used 220 grit sandpaper and gave the primer a fast light sanding.

Next was painting.  I wanted a grey-blue color.  However, all I had on hand was coastal blue or medium gray. I could have bought a gallon of a color I liked but I didn't want to spend the money.  So guess what I did?  Yep I mixed them together.

I wanted to use chalk paint, so I purchased some Plaster of Paris from the hardware store, (about $5 for a large container of it) and mixed it up.

1 part plaster of Paris disolved in HOT water
3 Parts Latex Paint

Mix your plaster and hot water together first, then mix in the paint.  It will be thinner than most paint.  After 2 coats of now "Slate Blue" chalk paint, this beast was really starting to shine.


I decided to distress the dresser.  I went back to my palm sander, and ruffed up the edges, legs and certain spots on the drawers.

Then I applied a glaze.  I bought my glaze in a discount bin.  It was a chocolate brown color and it was premixed.  I diluted it down with a little bit of water.  Then rubbed it on with a clean cloth, and rubbed it off with a damp one after about 15 minutes.  Here's the look it gave:

Then I spray painted the handles black.


I gave the whole thing a coat of wax and vwalla!


I love how it turned out!

I almost just want to keep it instead of reselling this baby!

What do you guys think?


Saturday, July 5, 2014

Twice Baked Sweet Potatoes


Mmmmmmmm........
Sweet potatoes are delicious.  This recipe is especially savory!
Twice Baked or Stuffed Sweet Potatoes!
  What could be better than a sweet potato, stuffed with cheese & bacon?

So here's the down-lo:

Ingredients:
1 large Sweet Potato
(I use the white variety, but you can use which ever you prefer.)
1/2 Small Onion- Sauteed
1 Strip of Bacon- Cooked
1 Clove Garlic- Minced & Sauteed
1/2 Cup Cheddar Cheese, plus additional for topping
Splash of milk

First pierce and bake your sweet potato in the microwave on high for 4-6 minutes or until tender.  If you prefer to bake them in the oven the first time around you can.  This will take an additional 30 minutes.  
Next, quarter your potato by cutting in half lengthwise, and then in half across the middle.

Scrape the flesh from the potato, leaving a small amount of flesh in the skins.  Just enough so the skins are sturdy and don't fall apart.

Next, combine all ingredients in a bowl including the potato flesh, and mix.  If the potatoes do not easily mash, use an electric mixer.  Do not over mix.  The consistency should be a little lumpy not baby food like.


Next, stuff your skins with the mixture in the bowl, and top with a little extra cheese.  The stuffing will overflow like this:


Bake in the oven for 10-12 minutes @ 375 degrees.

This is the result:


These have become a regular in our house!  To keep this recipe vegan, omit the bacon  and use vegan cheese, and almond milk.
I have  made it both ways and it is delicious either way.  These potatoes are quite hearty.  With only one large potato it makes 4 stuffed potatoes.  They go a long way!  

I hope you enjoyed this recipe!


Friday, July 4, 2014

Audrey Hepburn Inspired Toddler Hair


This Audrey Hepburn inspired do will get your little one the attention she deserves.  Good for medium to long length hair.


This is a super cute up do that you can do on your little one.  It's not as complicated as it looks, but it does look like you spent an hour on it! :)  You will need 3 rubber bands and 5 bobby pins.
Here's how you do it:
Start with a doing a BUMP in the front, by twisting a small section of hair at the top.  Push this foward and then pin it in place.


My little one has fine hair so it takes a couple of pins.  Next take another section.  There will be three sections of hair.  Not next to each other like a braid, but one on top of the other.
Put the top section in a ponytail, but only pull the hair through half way  like this:


Pin in place.  Next, seperate remaining hair into 2 more even sections.  Repeat the 1/2 ponytail pull-thru and pin each one in place, close to the others like this:


Put a clip at the bottom to hide the last rubberband.  My little one wore this hair all day and wrestled around with her 4 older brothers and it stayed in well.  Make sure your bobby pins are tight.


Audrey Hepburn inspired... Fun, Beautiful, and Fancy!  

Hope you enjoyed this tutorial.  Feel free to ask any questions. :)